When you drop a pin on a Google Map in .NET MAUI, tapping it shows a small callout — the info window. Out of the box, you get a title and a snippet, and that's it. The styling, fonts, and layout are entirely owned by the native Google Maps SDK on each platform.
For most production apps that isn't enough. You want your own card: brand colors, custom icons, multiple rows of metadata, a tappable detail action. This post walks through how we built a fully custom info window in .NET MAUI, including the platform-specific native hooks needed to make it work on both Android and iOS.
The full sample project is on GitHub: MauiGoogleMapsInfoWindow. Prefer to watch it built step by step? Here's the video walkthrough:
Video Tutorial
https://youtu.be/Dza9-zZukQM
The Problem
Onion.Maui.GoogleMaps is a solid MAUI wrapper over the native Google Maps SDKs, but it doesn't expose a public API for customizing the info window. You can set a Label and Address on a Pin — but the callout UI itself is rendered by the native SDK, and there's no managed hook to override it.
To show a fully custom card with your own layout, fonts, and icons, you have to reach down into the native map instance on each platform. That's the crux of the whole exercise.
Step 1 — Packing Data into the Pin
The native info window adapters only ever receive a Marker object. They can't reach back into your MAUI model, so any extra data you want to display has to ride along on the marker itself.
The trick is to encode everything you need into the Pin.Address field as a ||-delimited string before adding the pin to the map:
var pin = new Pin { Label = place.Name, Address = $"{place.Address}||{place.Category}||{place.Rating:F1}||{place.OpeningHours}", Position = new Position(place.Latitude, place.Longitude), Tag = place // keep the full object for navigation };
On the native side, you parse it back out:
var parts = marker.Snippet.Split("||"); var address = parts[0]; var category = parts[1]; var rating = parts[2]; var hours = parts[3];
It's a little blunt, but it's reliable and avoids any cross-layer lookups. The full model object also goes into Pin.Tag so navigation later doesn't need to re-parse anything.
Step 2 — Hooking into the Native Map
MAUI's HandlerChanged event fires once the native map view is ready — that's the right moment to attach a platform-specific adapter.
MyMap.HandlerChanged += OnMapHandlerChanged; private void OnMapHandlerChanged(object? sender, EventArgs e) { #if ANDROID SetupAndroidInfoWindow(); #elif IOS SetupIOSInfoWindow(); #endif }
On Android, you walk the native view hierarchy to find the MapView, call GetMapAsync, and set the adapter inside OnMapReady:
googleMap.SetInfoWindowAdapter(new CustomInfoWindowAdapter(_mauiContext));
On iOS, you access the native Google.Maps.MapView directly from the handler:
if (MyMap.Handler?.PlatformView is Google.Maps.MapView mapView) mapView.MarkerInfoWindow = (_, marker) => CustomInfoWindowRenderer.BuildView(marker);
Step 3 — Android: IInfoWindowAdapter
On Android, the work happens inside a class implementing GoogleMap.IInfoWindowAdapter. In GetInfoWindow(), you instantiate your MAUI ContentView, set its properties, and convert it to a native Android view with ToPlatformEmbedded:
public AndroidView? GetInfoWindow(Marker marker) { var infoWindow = new PinInfoWindow(); infoWindow.PlaceName = marker.Title; // parse snippet into address, category, rating, hours... return infoWindow.ToPlatformEmbedded(_mauiContext); }
GetInfoContents() returns null — this tells the SDK to use GetInfoWindow() for the full window replacement rather than just filling the content area. The big win here is that you get to author the Android card in plain XAML and reuse your existing MAUI styling.
Step 4 — iOS: Pure UIKit
iOS is where things get spicy. ToPlatformEmbedded crashes at runtime on iOS — MAUI's embedded rendering context conflicts with the Google Maps SDK's Metal pipeline (BubbleBehavior::Commit), even for a completely empty MAUI view. Setting ClipsToBounds = true on any subview triggers the same crash.
The only approach that actually works is building the info window entirely in UIKit:
- A UIView with a CALayer shadow for the card
- UILabel instances for the name, address, and each icon+text pair
- UIFont.FromName("FontAwesome6Free-Solid", 13) to load FontAwesome icons
- A custom TriangleView that overrides Draw() with Core Graphics for the callout pointer
mapView.MarkerInfoWindow = (_, marker) => CustomInfoWindowRenderer.BuildView(marker);
It means maintaining two implementations of the same card — XAML on Android, hand-built UIKit on iOS — but it's the price of stability on the iOS side.
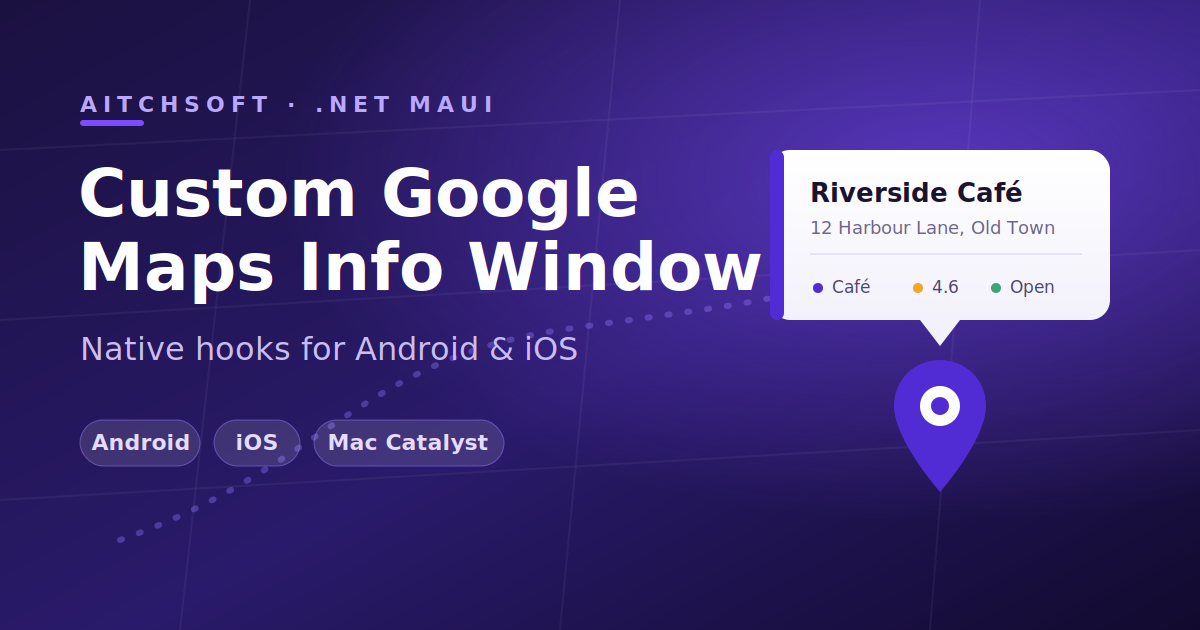
Step 5 — The Info Window Design
The shared design (used directly on Android via XAML, mirrored manually in UIKit on iOS) is a card with:
- A rounded Border with a purple accent bar on the left edge
- A place name (bold, 18pt) and address (13pt, truncated to two lines)
- A bottom row with three icon+label pairs: category, rating, and opening hours
- FontAwesome Solid icons for location, star, and clock
- A Polygon below the card forming the callout triangle pointer
Step 6 — FontAwesome Icons
fa_solid_900.ttf lives in Resources/Fonts/ and gets registered in MauiProgram.cs:
fonts.AddFont("fa_solid_900.ttf", "FASolid");
In XAML on Android:
<Label Text="" FontFamily="FASolid" FontSize="14" TextColor="#512BD4"/>
In UIKit on iOS:
var faFont = UIFont.FromName("FontAwesome6Free-Solid", 13); iconLabel.Font = faFont; iconLabel.Text = "\uf3c5";
Using FontAwesome instead of emoji ensures consistent rendering and full TextColor control across both platforms — emoji ignore TextColor entirely, so you'd lose theming.
Step 7 — Navigating from the Info Window
Finally, wire up InfoWindowClicked to push a detail page. Because the full model object is stored in Pin.Tag, there's no need to re-parse the snippet:
MyMap.InfoWindowClicked += async (_, e) => { if (e.Pin.Tag is PlacePin place) await Navigation.PushAsync(new PinDetailPage(place)); };
What You End Up With
Putting it all together, the sample app:
- Displays multiple custom pins on a Google Map
- Shows a fully custom-styled info window card when a pin is tapped
- Navigates to a per-pin detail page
- Renders FontAwesome Solid icons consistently across platforms
- Runs on Android, iOS, and Mac Catalyst
Prerequisites & Setup
To run the sample yourself you'll need:
- The .NET 10 SDK
- Visual Studio 2022 or VS Code with the .NET MAUI workload
- A Google Maps API key
Then:
git clone https://github.com/ihassantariq/MauiGoogleMapsInfoWindow.git cd MauiGoogleMapsInfoWindow
Open Constants.cs and replace the placeholder with your key:
public const string GoogleMapsApiKey = "YOUR_GOOGLE_MAPS_API_KEY";
Then build and run on your target platform:
dotnet build
Closing Thoughts
The interesting lesson here isn't really the info window — it's the pattern. When a cross-platform wrapper doesn't expose the hook you need, you don't have to abandon MAUI. You reach into the native handler, do the platform-specific work where it's required (XAML reuse on Android, pure UIKit on iOS), and keep everything else shared. The ||-delimited snippet trick and the Pin.Tag round-trip are small touches that keep the native and managed layers talking without overcomplicating the model.
If you're doing serious .NET MAUI, Xamarin-to-MAUI migration, or native SDK binding work, this kind of platform-bridging is exactly the territory we specialize in at AitchSoft.
Source code: github.com/ihassantariq/MauiGoogleMapsInfoWindow · License: MIT